Blogs & News
Using Shiny Modules to simplify building complex apps

Whenever I start writing a new Shiny application – the technology on which we’ve built our mini-apps capability – or when I want to prototype a new interesting piece of functionality to slot into an existing application, I consistently find myself running into the same issues:
- As the app becomes larger, the code becomes increasingly difficult to maintain as the number of inputs, outputs and reactive values and their interdependencies rapidly increase.
- I regularly find myself implementing the same pieces of functionality, such as reading data into the app and some way to filter that data to a set you are interested in.
There are usually ways to partially solve these issues – by abstracting pieces of functionality to functions for example, or by logically splitting pieces of your server and UI into separate files to be sourced. However, this tends not to solve the whole problem since the inputs and outputs share a global namespace across the application and so if you are defining them within functions you need to be careful to ensure you don’t have any ID collisions. Doing this can also mean that your functions are not self-contained and makes them difficult to reason about in isolation.
The R Shiny community seems to be in agreement that there needs to be a better defined way of modularising or abstracting Shiny app code. This post will introduce Rstudio’s new Shiny Modules which have been developed to address these issues.
What are Shiny Modules?
Shiny modules are a relatively new addition to R Shiny that provide a clearly defined way to abstract application code into reusable pieces of an application. These can be small pieces of functionality that you want to use across multiple apps, or they can be large chunks of an existing application you could use simply to better organise the code into manageable pieces.
Before I paraphrase the entire article, here’s a link to Rstudio’s introduction to the topic, Modularizing Shiny app code. It gives a great introduction to all the main features of Shiny Modules and shows a few examples of some simple modules. I’ll be introducing the basic concepts here but I highly recommend reading through this article too. I’ll also be using the csvFile module that is created as an example in the first few sections of the article.
Creating a Module
A Shiny Module is typically composed of two functions. One is for the UI of that module and the other for the server logic of that module.
I’m going to create a simple module, filterTable, for filtering a DataTable (so you’ll need the DT package to try it out). Along with loads of other features, DT gives us a really easy way of filtering a dataframe inside a Shiny app. You can find out more about it here.
Creating the UI Function
A good naming convention for the UI function of the module is to suffix the name with Input, Output or UI, depending on whether the UI is taking inputs for the server logic, presenting outputs from the server logic, or a mixture of both.
Here is the UI function for filterTable:
## I'm going to use the UI suffix since output DataTable gives us some inputs for free
filterTableUI <- function(id) {
  # Create a namespace function using the provided id
  ns <- NS(id)

  # Return a piece of UI
  # namespace the id by wrapping it in 'ns()'
  dataTableOutput(ns("dt"))
}
The module UI function needs to have id as its first argument. This allows the user to define the namespace for the module meaning that we only need to avoid name collisions of objects within this particular module. Inside the function, before doing anything else, we create a function to create namespaced IDs using the NS function. This allows us to namespace the IDs for any inputs any outputs referenced in the module UI. To do this we simply wrap any input or output ids in the namespacing function, for example we pass ns("dt") as the outputId argument for dataTableOutput.
Creating the Server Function
The server function for a module has three mandatory arguments: input, output and session. Beyond these you can define any number of additional arguments to the function.
We’ll call our server function filterTable. This needs to know what it is we would like to filter and so has one argument, data, after input, output and session which should be a reactive dataframe.
filterTable <- function(input, output, session, data) {
  ## render a DataTable with a filter for each column
  output$dt <- DT::renderDataTable({
    DT::datatable(data(), filter = "top")
  })

  ## create a reactive containing the rows remaining after filters are applied
  filtered <- reactive({
    data()[input$dt_rows_all, ]
  })

  return(filtered)
}
Note that we don’t need to reference any namespace in the server function. The output$dt will match up with the ns("dt") in the UI function since the input, output and session will be scoped to the correct namespace when we use the module in an application.
Using our Module
To use a module in the server of an application we need to use the callModule function which takes the module server function as its first argument, an id for the namespace as its second argument and any additional arguments defined for the module beyond the input, output and session arguments.
If the module server function has any outputs then you can assign these to a variable which can then be used elsewhere in the app. In the app below I use the csvFile module to allow users to read a csv file into a dataframe which is then passed to the filterTable module. I put the UI for csvFile in a sidebar and the filterTable UI in the main panel of the app.
server <- function(input, output, session) {
  inputData <- callModule(csvFile, "csv", stringsAsFactors = TRUE)
  filteredData <- callModule(filterTable, "filter", inputData)
}

ui <- fluidPage(
  sidebarLayout(
    sidebarPanel(csvFileInput("csv")),
    mainPanel(filterTableUI("dt"))
  )
)
The output of the filterTable module is assigned to a variable which can then be used elsewhere in the app.
Another Module
I frequently want users to be able to download data from my application and always find myself once again reading through the downloadHandler documentation to work out exactly how to link things up.
This piece of functionality could be a good candidate for another Shiny Module:
## additional argument to define the label on the downloadButton
csvDownloadUI <- function(id, label = "Download CSV") {
  ns <- NS(id)

  downloadButton(ns("download"), label)
}

## allow users of the module to input a (reactive) data.frame to download as csv and a name for the file
csvDownload <- function(input, output, session, data,
                        filename = paste0("data_", Sys.Date(), ".csv")) {

  output$download <- downloadHandler(
    filename = function() {
      filename
    },
    content = function(file) {
      write.csv(data(), file)
    }
  )
}
Putting it all together
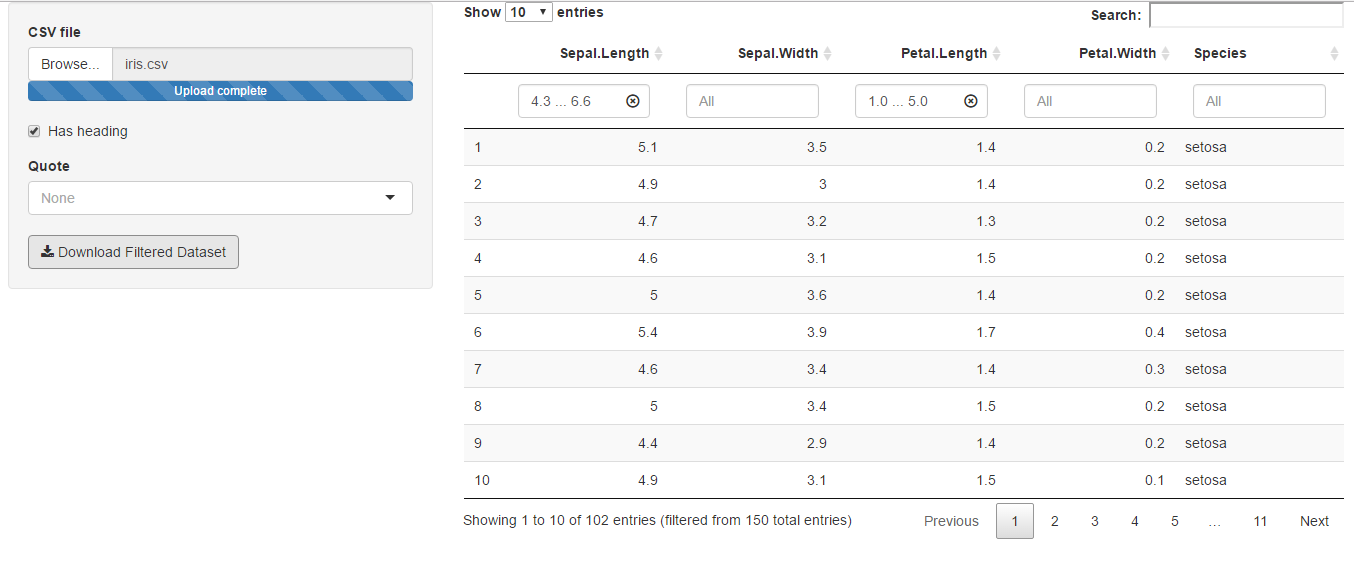
Now we have three modules with clearly defined inputs and outputs. Each of these also has a clearly defined piece of functionality and so we can create a simple application by gluing these pieces together. For example, in the application below I want to:
- Read some data into the app
- Filter that data based on user input criteria
- Download the filtered dataset
server <- function(input, output, session) {
  inputData <- callModule(csvFile, "csv", stringsAsFactors = TRUE)
  filteredData <- callModule(filterTable, "filter", inputData)
  callModule(csvDownload, "download_filtered", filteredData)
}

ui <- fluidPage(
  sidebarLayout(
    sidebarPanel(
      csvFileInput("csv"),
      csvDownloadUI("download_filtered", "Download Filtered Dataset")
    ),
    mainPanel(
      filterTableUI("filter")
    )
  )
)
Plugging these modules into other apps
The app we created above isn’t particularly exciting on its own but it’s a good start for creating something interesting. For example, the thing I’m really interested in might be setting up a way for users of my application to run some analysis on a dataset of their choice. With the modules above, we already have an easy way to get the user’s data into the app, filter it and then download the results after they have run their analysis. So we can spend our time on the new and interesting functionality rather than recreating all the necessary pieces to get to that point.
Hopefully the final example in this post also gives a good idea of how Shiny modules can take the task of writing a Shiny application and simplify it into gluing together the different pieces of functionality that you need. This could greatly lower the barrier to entry for new users learning how to use Shiny, allowing app templates to be created simply be putting together fundamental building blocks. Of course, this requires that modules you are using play well together, are robust and are well documented. The best way to ensure this is to bundle similar modules into an R package.